Skipping proper top load and compression testing doesn't just risk a bad batch — it risks recalls, non-compliance, and damaged customer trust across beverage packaging, automotive parts, and medical devices alike. A 2011 Grocery Manufacturers Association survey found that 58% of member companies had dealt with a recall in the prior five years, with total financial impact exceeding $100 million for 5% of respondents.
This guide breaks down what compression testing actually involves, why it matters, and how the process plays out from setup to results.
Key Takeaways
- Top load and compression testing measures the axial force a package withstands before failure
- Results drive material optimization, letting manufacturers reduce use without sacrificing strength
- The process follows six stages, from defining objectives to documenting final results
- Skipping proper fixture selection or sample conditioning is the most common cause of unreliable results
- ISO/IEC 17025 accredited testing gives compliance documentation the weight it needs for OEM acceptance and liability protection
What Is Top Load and Compression Testing?
Compression testing applies a controlled compressive load to a sample until it deforms, buckles, or collapses, measuring how much structural resistance it has. That's the whole concept in one sentence, but the terminology splits depending on which industry you're in.
Top load testing is the packaging world's term for this. It's what you'll hear used around bottles, cans, and cartons. Compression testing is the broader mechanical engineering term, covering everything from automotive brackets to medical device housings to industrial components. Same physics, different vocabulary depending on whether you're in a bottling plant or a materials lab.
Types of Compression and Top Load Tests
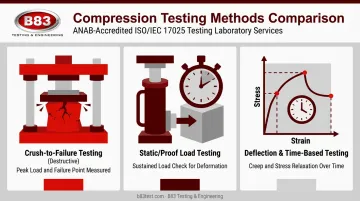
Not all compression tests are built the same. Three approaches dominate:
- Crush-to-failure testing (destructive): compression continues past yield, through buckling, to a defined collapse point. The specimen doesn't survive, and the test records peak load, deflection at yield, and failure load.
- Static/proof load testing: a predetermined load is held for a specified time to check whether the item survives without excessive deformation. This stays non-destructive only if the load remains below the damage threshold. Some standards, like ASTM D4577, allow the load to run until failure, so "static" doesn't always mean "safe."
- Deflection and time-based testing: load is tracked at a specified deflection point, or creep and stress relaxation is measured as deformation or force changes over time under sustained load.
Standards and Industries Where It's Used
The standard you choose depends entirely on what you're testing and what claim you need to support. Here's where the major standards currently stand:
| Standard | Current Status | What It Covers |
|---|---|---|
| ASTM D2659-16(2023) | Active | Column crush properties of blown thermoplastic containers |
| ASTM D642-25 | Active | Compressive resistance of shipping containers, components, and unit loads |
| ASTM D4577-19(2023) | Active | Constant vertical load resistance for stacked shipping containers |
| ASTM D4169-23e1 | Active | Full distribution-hazard evaluation, including compression as one element |
| ISO 8113:2004 | Current, reviewed 2022 | Vertical load resistance for glass containers |
While these standards center on packaging, the underlying compression testing discipline extends much further. Automotive components, medical device housings, electrical enclosures, and agricultural or construction equipment parts all rely on compression testing, often tested against component-specific ASTM/ISO methods rather than the packaging standards above. This is exactly the range of industries B83 Testing & Engineering regularly tests for.
Why Top Load and Compression Testing Is Critical
Compression testing sits at the intersection of risk reduction and cost control, while validating real-world performance. Skip it, and problems that should've been caught on a lab bench show up in a customer's warehouse instead.
The core benefits break down like this:
- Prevents field failures and recalls by catching structural weaknesses before products ship
- Enables material optimization by reducing wall thickness or material volume where strength allows, without compromising performance
- Supports regulatory compliance and OEM specification requirements that increasingly demand documented test data
- **Validates stacking and shipping durability** so packaging and components survive real distribution stresses, not just lab conditions
- Reduces warranty claims and liability exposure through pre-market testing that's documented and defensible
- Builds confidence in design decisions, backed by third-party accredited data rather than internal assumptions
On the material optimization point specifically, Quality Magazine's coverage of top-load compression testing notes that testing can identify where a lower volume of packaging material still provides sufficient strength. This includes reducing the risk that lightweight PET bottles crush during capping. That's a real, practical win for manufacturers under pressure to cut material costs without cutting corners on performance.
How Top Load and Compression Testing Works – Step by Step
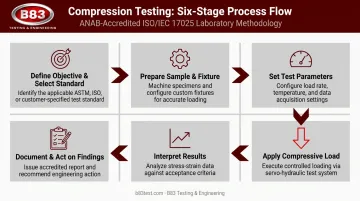
The process breaks into six practical stages. Most testing problems trace back to one of three oversights: using the wrong fixture for the sample geometry, running inconsistent crosshead speeds, or skipping sample conditioning entirely.
Step 1 – Define the Objective and Select the Standard
Start by determining why you're testing. Routine quality control, R&D design validation, and compliance certification each call for different rigor and, often, different standards. A QC spot-check doesn't need the same documentation depth as a certification test destined for a regulatory submission. Pick your ASTM or ISO method based on that objective, not the other way around.
Step 2 – Prepare the Sample and Fixture
Fixture selection matters more than most teams expect. Vented platens, self-adjusting fixtures, and nose cone assemblies each suit different sample geometries. Pick the wrong one, and you introduce measurement error before the test even starts. Samples also need conditioning per the standard's temperature and humidity requirements, since material properties shift with environmental exposure.
Step 3 – Set Test Parameters
Configure crosshead speed, load cell capacity, and target deflection or distance according to the chosen standard. Inconsistent crosshead speed is one of the most common sources of non-repeatable results: a slight variation here can shift peak load readings enough to flag a false pass or fail.
Step 4 – Apply the Compressive Load
The machine applies steady axial force until deformation, buckling, or a specified displacement point is reached. Throughout, the system captures peak load and displacement data continuously, not just at the endpoint.
Step 5 – Interpret the Results
Peak load, deflection curves, and failure mode get compared against pass/fail criteria or design specifications. A part might reach the required load but fail in an unexpected mode (buckling instead of crushing, for example). That distinction tells you something different about the design than a simple pass/fail number would.
Step 6 – Document and Act on Findings
Results drive real decisions: adjusting wall thickness, reinforcing a weak point, switching materials, or certifying compliance. Store the data for traceability, especially if it's supporting a compliance claim or OEM acceptance down the line.
Top Load Testing – Example Case Walkthrough
Here's a simplified, generic walkthrough showing how this plays out on something like a molded plastic container.
- Objective: The team needs to confirm the container survives stacking loads during a six-week distribution cycle. This is a design validation test, not routine QC.
- Setup: The team selects a flat compression platen to match the container's geometry and conditions samples at standard temperature and humidity for 24 hours beforehand, per the applicable standard.
- Testing: The team sets crosshead speed per spec and applies the load at a constant rate until failure.
- Interpretation: Peak load comes in below the target: the container buckles at the sidewall before reaching the required stacking force.
Common mistakes to avoid at each stage:
- Misaligned fixtures skew load distribution across the sample. Always verify platen alignment before starting
- Inconsistent test speed between sample batches makes results impossible to compare. Lock in crosshead speed per the standard, every run
- Skipped preconditioning leaves material properties unstabilized. Don't shortcut the conditioning window, even under schedule pressure
Based on the buckling failure mode, the engineering team increases sidewall wall thickness in the weakest zone by a measured amount and reruns the test. The revised design passes at the target stacking load with margin to spare, a specific, measurable fix driven directly by the compression data, not guesswork.
How B83 Testing & Engineering Can Help
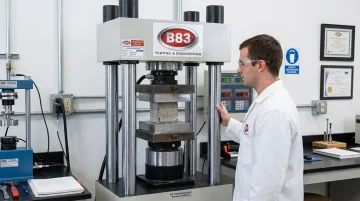
B83 Testing & Engineering is an ANAB-accredited ISO/IEC 17025 independent testing laboratory, engineer-owned since 2002, offering compression and load/displacement testing to manufacturers nationwide. Based in Milwaukee, Wisconsin, the lab handles both routine QC testing and custom validation programs for teams that need reliable, defensible data.
What sets B83 apart:
- Engineer-led test planning and custom fixture design for unique or non-standard sample geometries
- ISO/IEC 17025 accredited results suitable for compliance documentation, liability reduction, and OEM acceptance
- Cross-industry experience spanning automotive, medical device, aerospace, agricultural and construction equipment, and consumer products
- Flexible scheduling built to accommodate tight project timelines and shifting requirements
- Complementary testing options — pairing compression testing with vibration, shock, and environmental testing (via nine chambers spanning -100°F to +500°F) for complete product validation
For teams weighing compression testing against a tight product launch timeline, B83's testing capabilities cover the full validation chain in one lab. That means skipping the added time and cost of coordinating with multiple vendors.
Frequently Asked Questions
Compression and top load testing gives manufacturers clarity and control over design decisions that would otherwise be guesswork. Materials and standards change, so revisit your test protocols instead of assuming last year's approach still applies.
What is the top load testing procedure?
The procedure involves placing the sample on a matched compression fixture, applying a controlled axial load at a set crosshead speed, and recording peak force and deflection until failure or a specified endpoint is reached.
What are the four types of load testing?
Common categories include static/quasi-static, dynamic, cyclic/fatigue, and crush/destructive testing. These categories describe different aspects (loading rate versus damage endpoint), so a crush test can technically be either static or dynamic.
What is an example of load testing?
A common example is compressing a stacked PET bottle to determine the force at which it buckles during capping or shipping.
What's the difference between top load testing and compression testing?
Top load testing is the packaging industry's specific application of compression testing, focused on bottles, cans, and cartons. Compression testing is the broader mechanical discipline applied across materials, components, and finished products.
Which standards govern top load and compression testing?
Common standards include ASTM D2659, ASTM D642, ASTM D4577, ASTM D4169, and ISO 8113, though the applicable method always depends on the specific product and industry.
How do I choose the right lab for compression testing?
Look for ISO/IEC 17025 accreditation, engineering-led test planning, and experience across your specific industry. A lab that can also design custom fixtures for non-standard geometries adds real value beyond basic testing.