Introduction
An anchor bolt sits flush in a concrete slab, torqued to spec, looking exactly like the drawing said it should. Nobody questions it until a load shifts, a bracket flexes, or worse, something lets go entirely.
That gap between "installed correctly" and "verified correctly" is where proof load testing earns its place. It's the only method that confirms an anchor was set up the way the engineer intended, not just the way it appears on the surface.
The stakes are real. On a Boston tunnel project, NTSB investigators documented proof-test failure rates between 8% and 16% for anchors installed where water reached the bond line. Visual inspection never caught these failures.
This guide breaks down what proof load testing actually is, how it differs from destructive pull testing, and how the process runs from setup to sign-off.
TL;DR
- Proof load testing applies a preset, non-destructive load to confirm correct installation, not to cause failure
- Pull/ultimate testing loads anchors past failure to reveal their true, unknown capacity
- Engineers set test loads per codes like ACI 318, IBC, or BS 8539, staying below yield strength
- Most projects test a sample of installed anchors, not every one, except for life-safety applications
- An ISO-accredited independent lab keeps your results defensible if ever questioned
What Is an Anchor Proof Load Test?
A proof load test applies a specified, non-destructive tension (or occasionally shear) load to an installed or manufactured anchor to confirm it meets a required performance threshold. The anchor isn't pushed to its limit. It's loaded to a value the engineer has already deemed acceptable, then checked for excessive movement.
You'll find this testing across several fields:
- Construction and structural inspection — verifying post-installed anchors in concrete or masonry before they carry structural loads
- Manufacturing QA — confirming fastener-based assemblies meet spec before shipping
- Aerospace and automotive validation — checking hold-down points and structural fasteners under controlled load
- Equipment safety certification — verifying anchor points on machinery, lifting equipment, or fall-protection systems
Proof Testing vs. Pull (Ultimate) Testing vs. Torque Testing
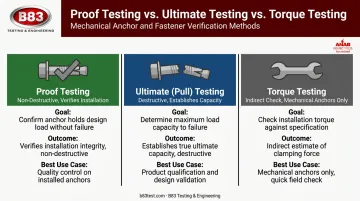
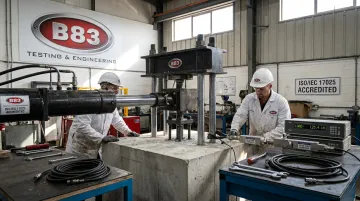
These three terms get mixed up constantly, and the confusion causes real problems on job sites. B83 Testing & Engineering, an ISO/IEC 17025-accredited lab, performs all three methods under controlled conditions, but they solve different problems and aren't interchangeable.
| Test Type | Goal | Result | Best Use Case |
|---|---|---|---|
| Proof testing | Confirm correct installation | Anchor stays undamaged and in service | Verifying installed anchors |
| Ultimate (pull) testing | Establish design capacity | Anchor is destroyed | Unknown substrate or anchor performance |
| Torque testing | Quick, indirect installation check | No load applied; no bond verification | Mechanical expansion anchors only |
Per ASTM E3121, the current standard governing field testing of anchors in concrete or masonry, proof loads must remain non-damaging by design. Torque testing isn't a valid substitute for adhesive anchors, since applied torque has no direct relationship to proper mixing, curing, or bond strength.
The distinction matters: proof testing verifies installation quality. Ultimate testing establishes capacity for an unknown condition. Mixing them up leads to either destroyed anchors that needed to stay in service, or false confidence from a torque check that never should've stood in for a tension test.
Why Anchor Proof Load Testing Is Critical
Skipping proof testing creates real liability, safety exposure, and expensive surprises down the line.
Better decisions, not assumptions. Published anchor capacities assume ideal installation conditions. Proof testing gives engineers real, site-specific data instead of trusting a catalog number.
Catches what inspection misses. Improper adhesive mixing, shallow embedment, and incorrect torque don't show up in a visual walkthrough. A proof test finds them before they become a field failure.
Keeps you code-compliant. Several codes tie testing or special inspection directly to anchor type and application:
- ACI 318 governs anchoring to concrete and its inspection requirements
- IBC Table 1705.3 mandates continuous or periodic special inspection for post-installed anchors, particularly adhesive anchors resisting sustained tension
- ASTM E488 establishes U.S. test methods for verifying anchor strength in concrete elements
Reduces long-term costs. Catching an installation error during testing costs far less than catching it after a warranty claim, a recall, or a field failure. Independent, ISO/IEC 17025-accredited labs like B83 Testing & Engineering catch these errors at the source, and for manufacturers embedding anchors or fasteners into equipment, that difference compounds across every unit produced.
Builds long-term reliability. For OEMs in automotive, construction, and industrial equipment, proof testing during production serves as ongoing quality assurance, protecting brand reputation and reducing returns.
How Anchor Proof Load Testing Works – Step by Step
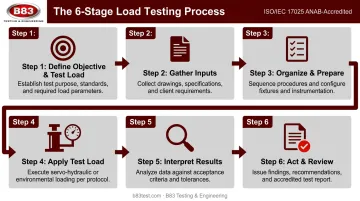
Engineers and labs follow this practical sequence to translate code requirements into an actionable test process. Most mistakes happen at predictable points:
- Skipping equipment calibration before testing begins
- Testing too small a sample size for the anchor population
- Misapplying the load formula for the anchor type
- Failing to document displacement properly during the hold period
Step 1 – Define the Objective and Test Load
Determine why testing is happening: code mandate, unknown substrate, or quality verification. This drives which standard or evaluation report applies. Getting this step wrong throws off pass/fail criteria and misaligns the entire test with code intent.
Step 2 – Gather Inputs
Collect anchor specs, substrate condition and strength, embedment depth, edge distance, and governing design values from manufacturer data or design software. Incomplete data here means an unreliable calculated proof load, no matter how carefully the test itself is run.
Step 3 – Organize & Prepare
Select the test method (hydraulic ram vs. torque-based, confined vs. unconfined setup), calibrate equipment, and set the sample size. Sampling schedules vary by jurisdiction; some guidance starts at a minimum of 2.5% and 3 anchors, doubling to 5% and 6 anchors after one failure, and reaching 100% after multiple failures.
Step 4 – Apply the Test Load
Apply the load gradually to the calculated proof value, hold it for the specified duration, and monitor for movement. Hold times vary by standard: some product evaluation reports specify at least 10 seconds, while other guidance treats 30 seconds as ramp-up time rather than a hold. Skipping calibration checks at this stage is one of the most common (and costly) errors.
Step 5 – Interpret Results
Compare observed displacement and load retention against acceptance criteria. A failure here usually points to an installation issue, not a design flaw in the anchor itself. This distinction matters for deciding whether to retrain a crew or reconsider a product spec.
Step 6 – Act & Review
Document everything. Retest additional anchors if failures occur, and feed findings back into installation procedures. This step turns proof testing from a pass/fail checkbox into a driver of real quality improvement.
Anchor Proof Load Testing – Example Case Walkthrough
Here's a simplified scenario that applies across industries, whether it's a steel bracket anchored into concrete or a hold-down point on industrial equipment:
Objective defined. A batch of anchors needs verification after a new installation crew takes over the job, so the engineer sets a proof load and a sample percentage based on the governing standard.
Inputs gathered. The team compiles anchor type, substrate strength, and embedment data, and one detail stands out: a non-standard installation depth that could affect test outcomes.
Test executed. The team applies and holds the load per the standard; most anchors pass cleanly, but one shows more displacement than expected, an immediate red flag for a possible installation problem.
Insights converted to action. The team investigates the flagged anchor further and tests additional anchors from the same batch to confirm whether the issue is isolated or widespread. The installation crew then receives retraining based on what the data reveals.
That final step captures the real value of proof load testing. It transforms a single failed anchor into a specific, actionable fix for the crew going forward.
How B83 Testing & Engineering Can Help
Anchor and fastener performance verification requires equipment, calibration, and engineering judgment that most manufacturers don't keep in-house. That's where an independent lab fits in.
We're B83 Testing & Engineering, an engineer-owned, ISO/IEC 17025:2017 ANAB-accredited independent testing laboratory based in Milwaukee, Wisconsin. Since 2002, we've supported manufacturers and OEMs across automotive, construction and agricultural equipment, aerospace, and industrial sectors with proof load, ultimate strength, and load/displacement testing.
Here's what that partnership typically includes:
- Accredited load/displacement measurement backed by documented calibration and traceable reporting
- Custom fixture design for unique anchor configurations, embedment conditions, or non-standard substrates
- Engineer-led interpretation of results, helping clients separate installation issues from genuine design limitations
- Flexible scheduling for a one-off verification test or an ongoing production QA program
- More than two decades of testing experience since 2002, backed by long-term client partnerships across every major industry
If you're verifying anchor or fastener performance for a new product line, a production QA program, or a one-time installation check, contact B83 Testing & Engineering at (414) 449-9396 or sales@b83test.com to discuss your project.
Frequently Asked Questions
What is a proof load test for anchor bolts?
It's a controlled tension test that applies a predetermined load, kept below yield strength, to confirm an anchor bolt was installed correctly. The process never pushes the anchor to failure.
What is the minimum amount of anchor ties that require proof testing?
Sample percentages vary by code and application, with some guidance starting at 3 anchors or 2.5% of the population. Life-safety applications may require 100% testing, and the engineer of record sets your exact requirement.
What's the difference between proof testing and pull (ultimate) testing?
Proof testing verifies installation quality using a set load that stays below failure. Pull, or ultimate, testing loads the anchor until it fails to determine unknown capacity. One preserves the anchor; the other destroys it.
How long should a proof load be held during testing?
Hold durations depend on the governing standard, with some product evaluation reports specifying at least 10 seconds. The anchor should show no significant movement throughout the hold period.
What standards govern anchor proof load testing?
Common references include ACI 318, IBC/CBC special inspection provisions, ASTM E3121, and BS 8539. The exact requirements depend on your jurisdiction and the specific application.
Can proof testing be used for all types of anchors?
Not always. Test equipment needs to connect to the anchor without loosening it, so certain flush-fixed or specialty anchors may not suit standard proof testing methods. A qualified lab, such as B83 Testing & Engineering, can confirm whether your anchor configuration is testable.